Elasticsearch
[TOC]
Elasticsearch
By:weimenghua
Date:2023.09.02
Description:Elasticsearch 全文检索引擎
1. Elasticsearch 简介
The Elastic Stack, 包括 Elasticsearch、Kibana、Beats和Logstash(也称为 ELK Stack)。能够安全可靠地获取任何来源、任何格式的数据,然后实时地对数据进行搜索、分析和可视化。Elaticsearch,简称为 ES,ES 是一个开源的高扩展的分布式全文搜索引擎,是整个 Elastic Stack 技术栈的核心。它可以近乎实时的存储、检索数据;本身扩展性很好,可以扩展到上百台服务器,处理PB级别的数据。
基本概念
| cluster | 整个elasticsearch 默认就是集群状态,整个集群是一份完整、互备的数据 |
|---|---|
| node | 集群中的一个节点,一般只一个进程就是一个node |
| shard | 分片,即使是一个节点中的数据也会通过hash算法,分成多个片存放,默认是5片 |
| index | 相当于rdbms的database, 对于用户来说是一个逻辑数据库,虽然物理上会被分多个shard存放,也可能存放在多个node中 |
| type | 类似于rdbms的table,但是与其说像table,其实更像面向对象中的class , 同一Json的格式的数据集合 |
| document | 类似于rdbms的 row、面向对象里的object |
| field | 相当于字段、属性 |
Elasticsearch比传统关系型数据库如下:
Relational DB ‐> Databases ‐> Tables ‐> Rows ‐> Columns Elasticsearch ‐> Indices ‐> Types ‐> Documents ‐> Fields
2. Elasticsearch 环境搭建
2.1 Docker 安装
启动 Elasticsearch 容器
docker network create my-network

docker run -d \
--name elasticsearch \
--network my-network \
-p 9200:9200 \
-e "discovery.type=single-node" \
elasticsearch:7.6.2
访问地址
http://127.0.0.1:9200/
启动 Elasticsearch-head 容器
docker run -d \
--name elasticsearch-head \
-p 9100:9100 \
mobz/elasticsearch-head:5
访问地址
http://127.0.0.1:9200/

修改 conf\jvm.option 文件
将#-Xms2g
#-Xmx2g修改成为:
-Xms340m
-Xmx340m
否则因为虚拟机内存不够无法启动
config\elasticsearch.yml 中末尾加入:
http.cors.enabled: true
http.cors.allow-origin: "*"
network.host: 127.0.0.1
目的是使ES支持跨域请求
3. Elasticsearch 基本操作
3.1 索引操作
- API 检测集群是否健康
- 方法:get
- 请求:http://127.0.0.1:9200/_cat/health?v
- 响应:

- 获取集群的节点列表
- 方法:get
- 请求:http://127.0.0.1:9200/_cat/nodes?v
- 响应:

- 创建索引
- 方法:put
- 请求:http://127.0.0.1:9200/person 请求体: 注意:默认情况下,创建的索引分片数量是 5 个,副本数量是 1 个。可以通过如下方式修改默认值: number_of_shards 分片 number_of_replicas 备份
{
    "settings": {
        "number_of_shards": 6,
        "number_of_replicas": 2
    }
}
- 响应:
{'acknowledged': True, 'shards_acknowledged': True, 'index': 'person'}
- 查看所有索引
- 方法:get
- 请求:http://127.0.0.1:9200/_cat/indices?v
- 响应:

| 响应字段 | 说明 |
|---|---|
| health | green(集群完整) yellow(单点正常、集群不完整) red(单点不正常) |
| status | 是否能使用 |
| index | 索引名 |
| uuid | 索引统一编号 |
| pri | 主节点几个 |
| rep | 从节点几个 |
| docs.count | 文档数 |
| docs.deleted | 文档被删了多少 |
| store.size | 整体占空间大小 |
| pri.store.size | 主节点占空间 |
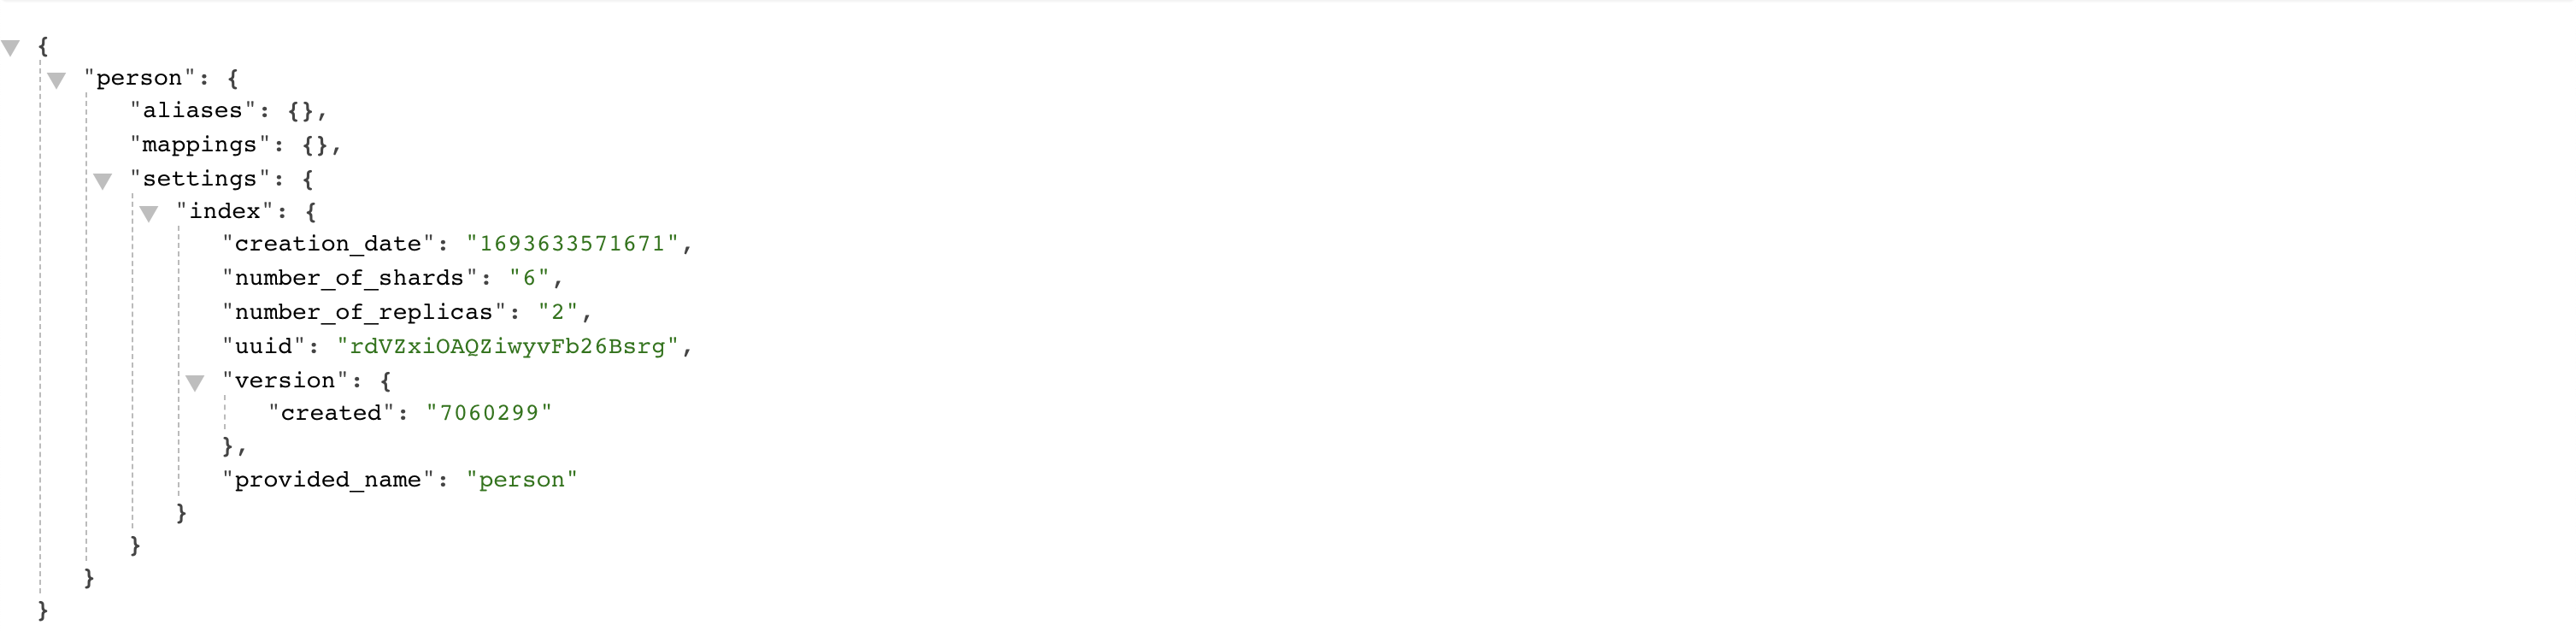
- 查看单个索引
- 方法:get
- 请求:http://127.0.0.1:9200/person
- 响应:
- 删除索引
- 方法:delete
- 请求:http://127.0.0.1:9200/person
- 响应:
{'acknowledged': True}
3.2 文档操作
文档:即索引库中某个类型下的数据,类比做数据库中的每一行数据。
- 创建文档 方法:post 请求:http://127.0.0.1:9200/person/_doc/1
{
   "name":"wei",
   "age":30
}
响应:
{'_index': 'person', '_type': '_doc', '_id': '1', '_version': 1, 'result': 'created', '_shards': {'total': 2, 'successful': 1, 'failed': 0}, '_seq_no': 0, '_primary_term': 1}
说明:此处发送请求的方式必须为 post,不能是 put,否则会发生错误。这里是因为 put 是一个幂等的请求,post 生成的 id 是随机的。使用 JMeter 创建文档时注意设置编码:utf-8,否则中文会变成 ???
- 查看单个文档
- 方法:get
- 请求:http://127.0.0.1:9200/person/_doc/1
- 响应:

说明:查看文档时,需要指明文档的唯一性标识,类似于 MySQL 中数据的主键查询
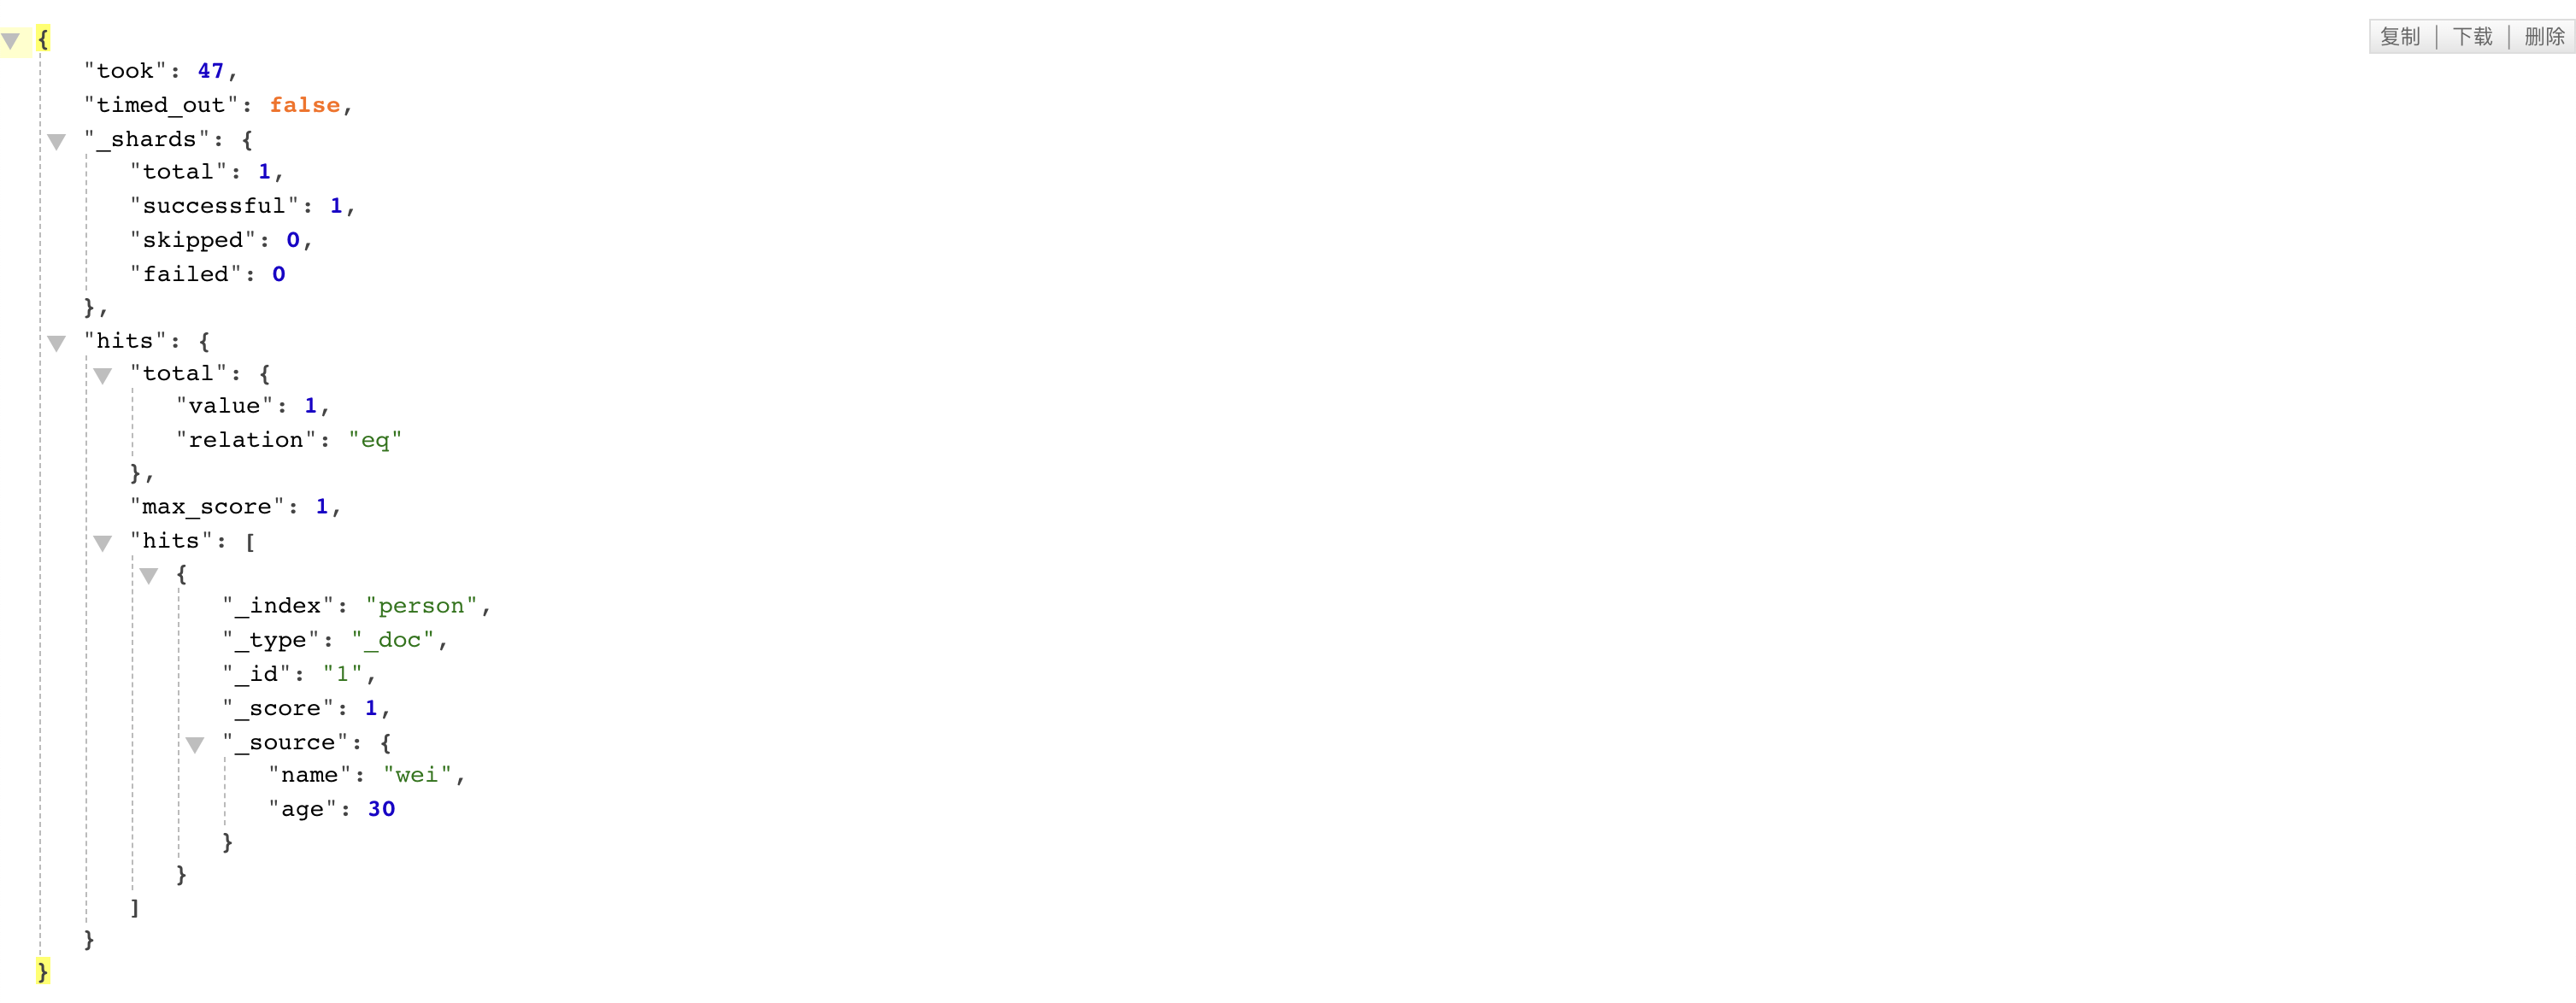
- 查看多个文档
- 方法:get
- 请求:http://127.0.0.1:9200/person/_search // <index_name>/_search
- 响应:
- 修改文档
- 方法:post
- 请求:http://127.0.0.1:9200/person/_doc/1 { "name":"weiwei", "age":18 }
- 响应:
{'_index': 'person', '_type': '_doc', '_id': '1', '_version': 2, 'result': 'updated', '_shards': {'total': 2, 'successful': 1, 'failed': 0}, '_seq_no': 1, '_primary_term': 1}
- 删除文档
- 方法:delete
- 请求:http://127.0.0.1:9200/person/_doc/1
- 响应:
{'_index': 'person', '_type': '_doc', '_id': '1', '_version': 3, 'result': 'deleted', '_shards': {'total': 2, 'successful': 1, 'failed': 0}, '_seq_no': 2, '_primary_term': 1}
3.3 curl 操作索引和文档
直接访问本地 ES API
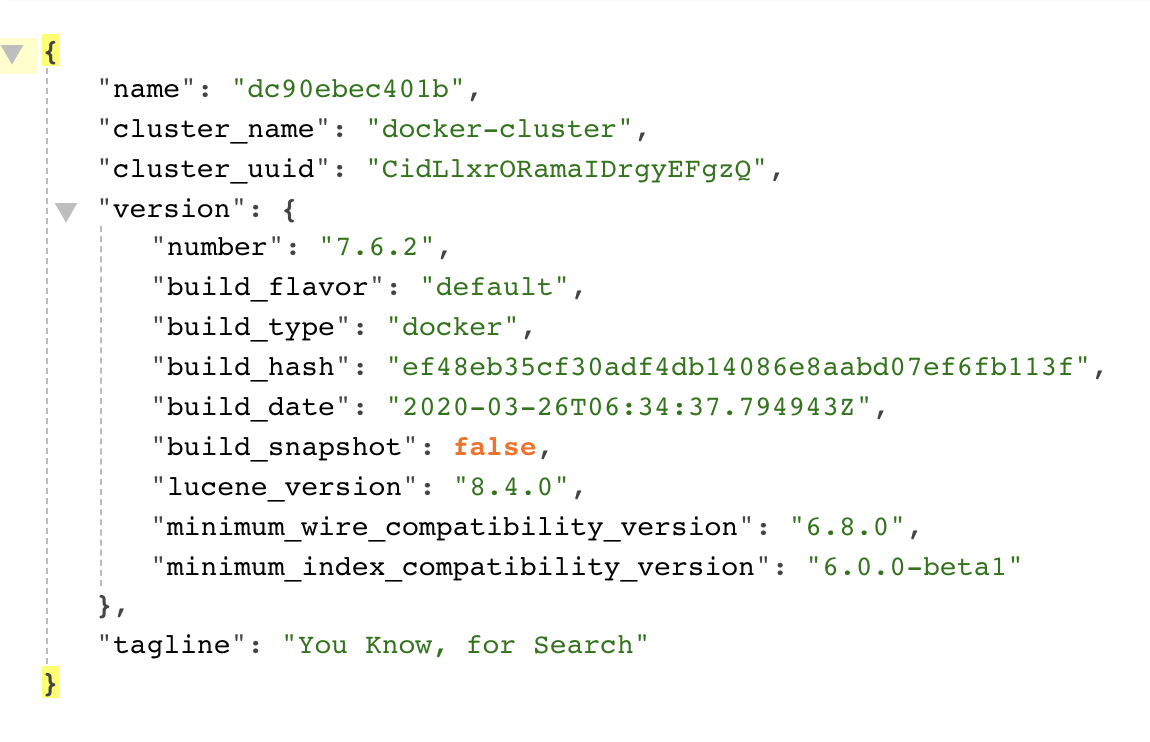
curl -XGET http://127.0.0.1:9200/
查看集群健康状态 "status":green(健康)、yellow(部分副本未分配)、red(主分片缺失)"number_of_nodes":节点数量。
curl -XGET 'http://127.0.0.1:9200/_cluster/health?pretty'
查看节点信息
curl -XGET 'http://localhost:9200/_cat/nodes?v'
查看分片分配情况
curl -XGET 'http://localhost:9200/_cat/shards?v'
检查未分配的分片
curl -XGET 'http://localhost:9200/_cluster/allocation/explain?pretty'
快照备份 注:没有实践过
curl -XPUT 'http://localhost:9200/_snapshot/my_backup'
curl -XPUT 'http://localhost:9200/_snapshot/my_backup/snapshot_1?wait_for_completion=true&pretty'
--------------------------------------------------------------------------------------------
创建索引
curl -XPUT "http://127.0.0.1:9200/<index_name>"
查看所有索引
curl -XGET 'http://127.0.0.1:9200/_cat/indices?v'
curl -XGET "http://127.0.0.1:9200/_cat/indices/?v&pretty&h=index,pri,rep,docs.count,docs.deleted,store.size,pri.store.size"
查看索引映射(mapping)
curl -XGET 'http://127.0.0.1:9200/<index_name>/_mapping?pretty'
查看索引内的前 n 个文档
curl -XGET "http://127.0.0.1:9200/<index_name>/_search?size=10"
删除索引
curl -XDELETE "http://127.0.0.1:9200/<index_name>"
--------------------------------------------------------------------------------------------
创建文档
curl -XPUT "http://127.0.0.1:9200/<index_name>/_doc/<document_id>" -d '{"field1": "value1", "field2": "value2"}'
更新文档
curl -XPOST "http://127.0.0.1:9200/<index_name>/_update/<document_id>" -d '{"doc": {"field1": "new_value"}}'
删除文档
curl -XDELETE "http://127.0.0.1:9200/<index_name>/_doc/<document_id>"
查看单个文档(文档 id 根据 <查看索引内的前 n 个文档> 接口获取,1、2、3...)
curl -XGET "http://127.0.0.1:9200/<index_name>/_doc/<document_id>"
1. 搜索文档 - 查询所有文档 (match_all)
curl -XGET "http://localhost:9200/<index_name>/_search" -H "Content-Type: application/json" -d'
{
"query": {
"match_all": {}
}
}'
2. 搜索文档 - 根据 title 精确匹配,查询 title 为 "scrum_sprint_risk_template" 的文档
curl -XGET "http://localhost:9200/<index_name>/_search" -H "Content-Type: application/json" -d'
{
"query": {
"term": {
"title.keyword": "scrum_sprint_risk_template"
}
}
}'
3. 搜索文档 - 根据 content 模糊查询,查询 content 包含 "风险" 的文档:
curl -XGET "http://localhost:9200/<index_name>/_search" -H "Content-Type: application/json" -d'
{
"query": {
"match": {
"content": "风险"
}
}
}'
4. 搜索文档 - 查询 status 为 1 的文档
curl -XGET "http://localhost:9200/<index_name>/_search" -H "Content-Type: application/json" -d'
{
"query": {
"term": {
"status": 1
}
}
}'
5. 搜索文档 - 组合查询,查询 status 为 1 且 spaceId 为 2 的文档:
curl -XGET "http://localhost:9200/<index_name>/_search" -H "Content-Type: application/json" -d'
{
"query": {
"bool": {
"must": [
{ "term": { "status": 1 }},
{ "term": { "spaceId": 2 }}
]
}
}
}'
6. 分页查询 - 每页两条,查询所有文档,返回第 1 页,每页 2 条数据:
curl -XGET "http://localhost:9200/<index_name>/_search" -H "Content-Type: application/json" -d'
{
"query": {
"match_all": {}
},
"size": 2,
"from": 0
}'
7. 排序查询 - 按 size 降序排序,查询所有文档,按 size 字段从大到小排序:
curl -XGET "http://localhost:9200/<index_name>/_search" -H "Content-Type: application/json" -d'
{
"query": {
"match_all": {}
},
"sort": [
{ "size": { "order": "desc" }}
]
}'
8. 多字段查询 - 查询 title 或 content 包含 "模板" 的文档
curl -XGET "http://localhost:9200/<index_name>/_search" -H "Content-Type: application/json" -d'
{
"query": {
"multi_match": {
"query": "模板",
"fields": ["title", "content"]
}
}
}'
9. 统计查询 - 获取文档总数
curl -XGET "http://localhost:9200/<index_name>/_count" -H "Content-Type: application/json" -d'
{
"query": {
"match_all": {}
}
}'
10. 搜索文档 - 匹配单个字段(match)
curl -XPOST "http://127.0.0.1:9200/<index_name>/_search" -H 'Content-Type: application/json' -d '{"query": {"match": {"field": "value"}}}'
11. 搜索文档 - 精确短语匹配(match_phrase)
curl -XPOST "http://127.0.0.1:9200/<index_name>/_search" -H 'Content-Type: application/json' -d '{"query": {"match_phrase": {"field": "value"}}}'
12. 搜索文档 - 查询特定 ID 的文档 (ids) 查询 ID 为 1 和 2 的文档
curl -XGET "http://localhost:9200/<index_name>/_search" -H "Content-Type: application/json" -d'{"query": {"ids": {"values": ["1", "2"]}}}'
知识碎片
k8s endpoint
username:password@elasticsearch-client.comm.svc.cluster.local:9200

如果 Elasticsearch Service 是 ClusterIP 类型,可以通过端口转发本地访问:
kubectl port-forward svc/elasticsearch-master 9200:9200 -n <namespace>

如果 Pod 频繁 OOM,可以修改 ES_JAVA_OPTS:
kubectl edit statefulset elasticsearch-master -n <namespace>
找到 env 并修改:
```
- name: ES_JAVA_OPTS
  value: "-Xms4g -Xmx4g"  # 根据节点内存调整
```