Git
[TOC]
Git
By: weimenghua
Date: 2023.01.01
Description: Git 分布式版本控制系统
参考资料
all-about-git
git-scm.com
learngitbranching
1. Git 工作流程
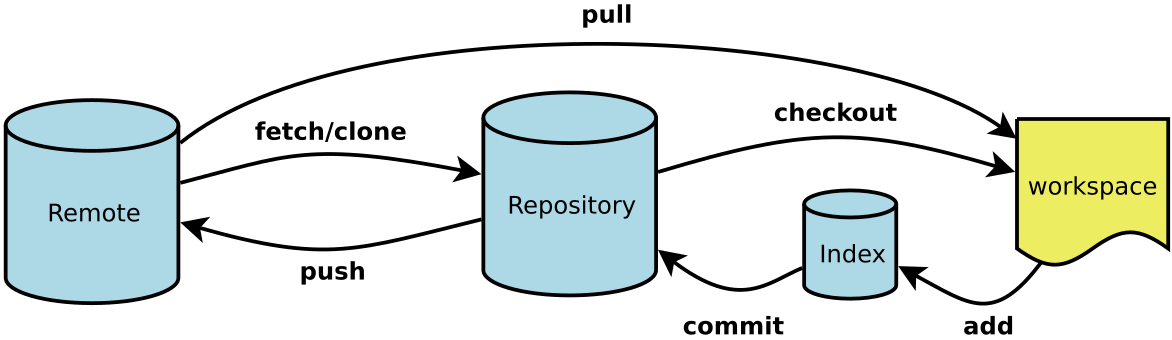
- Workspace:工作区
- Index / Stage:暂存区
- Repository:仓库区(或本地仓库)
- Remote:远程仓库
工作区 > 暂存区
git add <file/dir>

暂存区 > 本地仓库
git commit -m "暂存区 > 本地仓库"

本地仓库 > 远程仓库(本地 master 分支推送到远程 origin 仓库)
git push origin master

工作区 < 暂存区(暂存区文件内容覆盖工作区文件内容)
git checkout -- <file>

暂存区 < 本地仓库(本地仓库文件内容覆盖暂存区文件内容)
git reset HEAD <file>

本地仓库 < 远程仓库
git clone <remoteUrl>
示例 Demo
创建文件夹
mkdir demo

进入文件夹
cd demo

初始化本地仓库,如果没看见.git 目录,使用 ls -ah 可见,注:将隐藏文件设置可见
git init

创建文件
echo 123 >>  README.md

提交文件到暂存区
git add README.md

提交文件到本地仓库
git commit -m "first commit"

关联远程仓库
git remote add origin git@gitee.com:<userName>/<repoName>.git

更改远程仓库地址
git remote ser-url origin git@gitee.com:<userName>/<repoName2>.git

推送到远程仓库
git push -u origin master
= git branch --set-upstream-to=origin/master master + git push origin master

修改本地默认关联的远程仓库
git branch --set-upstream-to=origin/main
示例 Demo(简洁版)
mkdir demo
cd demo
git init
touch README.md
git add README.md
git commit -m "first commit"
git remote add origin git@gitee.com:<userName>/<repoName>.git
git push -u origin master
2. Git 知识点
Git 存储
Git 存储内容是通过 object 的形式,文件内容是 blob 的 object,目录是 tree 的 object,commit 就是 commit 的 object。
Blob 对象表示一个不可变、原始数据的类文件对象。 它的数据可以按文本或二进制的格式进行读取,也可以转换成 ReadableStream 来用于数据操作。 Blob 表示的不一定是 JavaScript 原生格式的数据。 File 接口基于 Blob ,继承了 blob 的功能并将其扩展以支持用户系统上的文件。
git cat-file -t <commitId 或者 ?>
查看(对象类型)每个 SHA-1 的类型

git cat-file -p <commitId 或者 ?>
查看(对象内容)每个对象的内容和简单的数据结构

Git 文件状态
- 已修改(modified)
- 已暂存(staged)
- 已提交(committed)
- 未追踪(Untrack)
Git commit 规范
- type: commit 的类型
- feat: 新特性
- fix: 修改问题
- refactor: 代码重构
- docs: 文档修改
- style: 代码格式修改,注意不是 css 修改
- test: 测试用例修改
- chore: 其他修改,比如构建流程,依赖管理.
- pref: 性能提升的修改
- build: 对项目构建或者依赖的改动
- ci: CI 的修改
- revert: revert 前一个 commit
Git 设置
设置 Git 缓冲区大小
1、将本地 http.postBuffer 数值调整到 GitHub 服务对应的单次上传大小配置: http.postBuffer 默认单位为 B(字节),所以500MB=10241024500。
方法一:全局配置 git config --global http.postBuffer 524288000
方法二:当前仓库配置 git config http.postBuffer 524288000
2、查看 http.postBuffer 数值是否设置成功
查看当前的 Git 配置 git config --list
.git 目录结构
查看命令:tree -L 1 .git
.git
├── COMMIT_EDITMSG
├── FETCH_HEAD
├── HEAD
├── ORIG_HEAD
├── config
├── description
├── hooks
├── index
├── info
├── lfs
├── logs
├── objects
├── packed-refs
└── refs
- .git/COMMIT_EDITMSG - 存储提交消息
- .git/FETCH_HEAD - 存储最近一次从远程仓库执行的 git fetch 命令的结果
- .git/HEAD - 当前代码仓库的分支指针
- .git/ORIG_HEAD - 保存上一次执行某些具有潜在危险操作的命令(如git reset、git revert、git cherry-pick等)前所处的提交
- .git/config - 当前代码仓库本地的配置文件
- 本地配置文件(.git/config)和全局配置文件(~/.gitconfig)
- 通过执行如下命令,可以将用户配置记录到本地代码仓库的配置文件中去
- git config user.name "demo"
- git config user.email "demo@demo.com"
- .git/description - 当前代码仓库的描述信息
- .git/hooks - 当前代码仓库默认钩子脚本
- .git/index - 暂存区、Stage 或 Cache,记录将要提交到版本库的文件和文件状态
- .git/info - 当前仓库的排除等信息
- .git/lfs - 存储 lfs 信息
- .git/logs - 操作日志
- .git/objects - 当前代码仓库代码的存储位置
- blob 类型
- commit 类型
- tree 类型
- .git/packed-refs - 记录了分支、标签和其他引用的提交(commit)信息
- .git/refs - 当前代码仓库的头指针
.gitignore
忽略文件和目录
例如:folderName : 表示忽略 folderName 文件和 folderName 目录,会自动搜索多级目录,比如:*/*/folderName。

仅忽略 folderName 文件,而不忽略 folderName 目录,其中,感叹号“!”表示反向操作。
例如:!folderName/
.gitkeep
Git 不能直接提交空文件夹,需在空文件夹里 vi .gitkeep,按 Esc,输入 :wq!保存并退出。
其实在 git 中 .gitkeep 就是一个占位符。可以用其他 比如 .nofile 等文件作为占位符。
3. Git 命令
目录(字母排序)
- git add
- git archive
- git blame
- git branch
- git bundle
- git checkout
- git cherry-pick
- git clean
- git clone
- git commit
- git config
- git diff
- git fetch
- git gc
- git init
- git log
- git pull
- git push
- git rebase
- git remote
- git reset
- git revert
- git rm
- git show
- git stash
- git status
- git submodule
- git subtree
- git tag
- other
git add
添加当前目录的所有文件到暂存区
git add .

添加指定文件/文件夹到暂存区
git add <file>/<fileDir>
git archive
是一个 Git 命令,用于创建一个存储库内容的归档文件,保留指定状态的快照。这在发布项目或分享存储库的快照时特别有用,因为这样可以不包括整个历史记录和元数据。以下是 git archive 命令的使用方法:
创建当前分支最新提交的归档文件
git archive -o archive-name.tar HEAD

可以指定特定的提交、标签或分支来归档
git archive -o archive-name.tar <commit-or-branch>

如果只想归档存储库中的特定目录,可以指定该目录
git archive -o archive-name.tar HEAD <directory>

默认情况下,git archive 创建的是 tar 包。你也可以使用 --format 选项来创建 zip 文件:git archive --format=zip -o archive-name.zip HEAD

示例
git archive --format=tar.gz --prefix=test_repo_1.0.0/ --output=test_repo_1.0.0.tar.gz --remote=ssh://git@example.com/testent001/test_repo.git v1.0.0
git blame
追溯一个指定文件的历史修改记录
git blame README.md

-e 选项显示作者的电子邮件地址而不是用户名
git blame -e README.md
git branch
查看本地分支
git branch

查看远程分支
git branch -r

展示本地分支关联远程仓库的情况
git branch -vv

查看当前分支
git symbolic-ref -q --short HEAD

创建分支
git branch <brachName>

切换分支
git checkout <brachName>

分支的快速创建与切换
git checkout -b <brachName>

修改本地分支名称
git branch -m <oldBranchName> <newBranchName>

将本地新分支推送到远程仓库
git push --set-upstream origin <newBrachName>

把本地分支和远程分支进行关联
git branch --set-upstream-to=origin/<brachName> <brachName>

合并分支,将完成后的代码合并到 master 主分支上
git checkout master
git merge <branchName>

删除本地分支
git branch -d <branchName>

强制删除一个没有合并的分支
git branch -D <branchName>

删除远程分支
git push origin :<branchName>
git push origin --delete <branchName>

显示所有已合并到当前分支的分支
git branch --merged

显示所有未合并到当前分支的分支
git branch --no-merged

查看有哪些分支包含 commit_id
git branch --contains <commit_id>

图示当前分支历史
git show-branch

图示所有分支历史
git show-branch --all

删除已经合并到 master 的分支
git branch --merged master | grep -v '^\*\|  master' | xargs -n 1 git branch -d

删除本地所有分支
git branch | grep -v "master" | xargs git branch -D

shF删除远程所有分支
git push origin --delete $(git branch -r | grep -v master | awk '{print $1}' | sed 's/origin\///')

查看分支创建者
git log --oneline master | cut -d " " -f 1 | tail -1 | xargs git log
git for-each-ref --format='%(committerdate) %09 %(authorname) %09 %(refname)' | sort -k5n -k2M -k3n -k4n
git bundle
通过归档移动对象和引用
git bundle create <file> <git-rev-list-args>
git bundle verify <file>
git bundle list-heads <file> [<refname>…]
git bundle unbundle <file> [<refname>…]

将历史记录从计算机 A上的存储库 R1传输到计算机 B上的另一个存储库 R2中
machineA$ cd R1
machineA$ git bundle create file.bundle master
machineA$ git tag -f lastR2bundle master

machineB$ git clone -b master /home/me/tmp/file.bundle R2
git checkout
切换本地分支
git checkout <branchName>

切换远程分支
git fetch --all
git checkout -b <localBranchName> origin/<remoteBranchName>

放弃所有工作区的修改
git checkout .

放弃对指定文件的修改
git checkout -- <fileName>

放弃工作区和暂存区的所有修改
git checkout -f

取文件 <fileName> 在 <commitId> 版本
git checkout <commitId> <fileName>

在当前分支上 取出 <tagName> 的版本
git checkout <tagName>

放弃当前对文件 <fileName> 的修改
git checkout master <fileName>

快速切换到上一个分支
git checkout -
git cherry-pick
这个是复制一次 commit 提交,然后在当前分支上重新提交一遍;也就是将指定 commit 的合并到当前分支;
git cherry-pick <commitId>

终止 cherry-pick
git cherry-pick --abort
git clean
清理工作目录中的未跟踪文件
git clean -f

查看工作目录中的未跟踪文件
git clean -n

删除某个特定目录下的未跟踪文件
git clean -f path/to/your/directory
git clone
克隆仓库到本地
git clone <repoUrl>

克隆仓库到本地指定目录
git clone <repoUrl> <localDir>

指定分支进行克隆仓库
git clone -b <branchName> https://iewiewiew:password@gitee.com/iewiewiew/wei-notebook.git

Git 只会下载指定分支的代码和提交记录,而不会下载其他分支的代码和提交记录,这可以有效减少克隆代码所需的时间和磁盘空间
git clone --single-branch -b master <repoUrl>

指定克隆深度进行克隆仓库
git clone --depth <nums> https://iewiewiew:password@gitee.com/iewiewiew/wei-notebook.git

git clone -b master 和 git clone --single-branch -b master 的区别
git clone -b master 命令会克隆指定分支(这里是 master 分支)的所有提交记录,包括该分支的所有历史记录和其他分支的提交记录
git clone --single-branch -b master 命令则只会克隆指定分支的所有提交记录,而不会克隆其他分支的提交记录

将浅层存储库转换为完整存储库
git pull --unshallow 或者 git fetch --unshallow
或者修改 .git/config
git config remote.origin.fetch "+refs/heads/*:refs/remotes/origin/*"

克隆版本库远程主机自动被 Git 命名为 origin,如果想用其他的主机名,git clone 命令的 -o 选项指定
git clone -o <hostName> <repoUrl>

使用账号密码进行克隆仓库
git clone https://${username}:${password}@${host}/${repoPath}.git
git clone https://iewiewiew:password@gitee.com/iewiewiew/wei-notebook.git

git clone --verbose 是用于克隆 Git 代码仓库的命令,其中 --verbose 是一个选项,用于显示详细的输出信息
git clone --verbose https://${username}:${password}@${host}/${repoPath}.git
git commit
将暂存区内容提交到版本库,进入 vi 命令界面输入提交信息
git commit

提交
git commit -m 'commit info'

将 add 和commit 合为一步
git commit -am 'commit info'
=git add -u + git commit -m <message>

合并上一次提交(用于反复修改),进入 vi 命令界面输入提交信息
git commit --amend

合并上一次提交(用于反复修改)
git commit --amend -m 'commit info'

查看分支的最新 commit_id
cat .git/refs/heads/master
git config
查看配置信息 注:不带参数的情况,等同于:带--local 参数,--local 仓库配置;--global 用户配置;--system 系统配置
git config -l
git config -l --local
git config -l --global
git config -l --system

配置文件的位置
.git/config 文件:位于 git 目录的 config 文件,特定指向该单一的库,仅对当前仓库有效
~/.gitconfig 文件:具体到个人用户,此账户下所有的 Git 仓库都使用这个配置文件。可以通过传递 --global 选项使 Git 读或写这个特定的文件
/etc/gitconfig 文件:包含了适用于系统所有用户和所有仓库的值。如果你传递参数选项--system 给 git config,它将明确的读和写这个文件

查看仓库 config
cat .git/config

查看用户 config
cat ~/.gitconfig

查看系统 config
cat /etc/gitconfig

查看用户名
git config user.name

查看邮箱
git config user.email

编辑配置文件
git config --edit

编辑用户名
git config user.name "wmh"

编辑邮箱
git config user.email "666@qq.com"

删除用户名
git config --unset user.name

删除邮箱
git config --unset user.email

无需每次都输入密码,输入密码后执行下面代码就可以了
git config --global credential.helper store
git config --global credential.helper --replace-all store
git config --global credential.helperselector.selected manager-core

可用
git config --global credential.helper store
git config --global user.name "1425615649@qq.com"
git config --global user.password "password"

这一步会在用户目录下的 .gitconfig 文件最后添加:
[credential]
    helper = store
查看配置
cat ~/.gitconfig
git config --show-origin --get credential.helper

待定
vim ~/.git-credentials
# 输入以下内容
https://{username}:{password}@github.com

修改密码,如果账号密码有变动 用这个命令
git config --system --unset credential.helper

重新输入账号密码应该就能解决了,如果用了第一个命令 还不能解决问题那么 用这个命令:
git config --global http.emptyAuth true

设置为区分大小写
git config core.ignorecase false

移除代理
git config --global --unset http.proxy

git status 等命令自动着色
git config --global color.ui true
git config --global color.status auto
git config --global color.diff auto
git config --global color.branch auto
git config --global color.interactive auto
git diff
查看具体修改了什么地方,尚未缓存的改动
git diff

显示摘要而非整个 diff
git diff --stat

查看已缓存的改动
git diff --cached

查看本地和远程分支的差异
git diff remotes/origin/master

查看已缓存的与未缓存的所有改动
git diff HEAD

查看当前分支和指定分支的差异
git diff ..<branch>
git diff ..master

查看两个分支之间的详细差异
git diff <first branch> <second branch>
git diff develop master
git diff develop..master
git diff develop...master

查看两个分支之间差异的部分=
git diff <first branch> <second branch> --stat
git diff develop...master --stat

将输出重定向到文件
git diff develop master > diffFile.diff
git diff commit1 commit2 > patchfile.patch

待定
git --no-pager diff develop...master --stat

查看指定文件的详细差异
git diff <first branch> <second branch> <文件路径>
git diff develop...master README.md

查看两个 commit 分支之间的差异
git diff <commit1> <commit2>

查看今天写了多少行代码
git diff --shortstat "@{0 day ago}"
git fetch
将某个远程主机的更新,全部取回本地
git fetch <hostName>

只取回远程主机特定分支的更新
git fetch <hostName> <branchName>
取回 origin 主机的 master 分支更新
git fetch origin master

获取所有分支
git fetch -pv

抛弃本地所有的修改,回到远程仓库的状态
git fetch --all && git reset --hard origin/master

重设第一个 commit,把所有的改动都重新放回工作区,并清空所有的 commit
git update-ref -d HEAD
git fsck
git fsck
检查整个仓库
git fsck 命令用于检查 Git 仓库的完整性。它会执行一系列检查,以确保仓库中的对象(提交、树、blob等)之间的引用关系是正确的,并且所有对象都可以被访问到。

检查特定的提交:
git fsck <commit-hash>

检查未引用的对象
git fsck --unreachable

显示更多详细信息
git fsck --full

找出悬空 blob
git fsck --unreachable | grep "^blob^"

检查引用日志
git reflog expire --expire=now --all

删除悬空 blob
git prune --expire now
git gc
git gc

git gc --auto

查看文件大小
git count-objects -v

查看占用空间最多的五个文件
git rev-list --objects --all | grep "$(git verify-pack -v .git/objects/pack/*.idx | sort -k 3 -n | tail -5 | awk '{print$1}')"

根据文件 id 查看文件名
git rev-list --objects --all | grep 8f10eff91bb6aa2de1f5d096ee2e1687b0eab007

删除.git 的大文件
git filter-branch --force --index-filter "git rm --cached --ignore-unmatch '<fileName>'" --prune-empty --tag-name-filter cat -- --all

rm -rf .git/refs/original/
git reflog expire --expire=now --all
git fsck --full --unreachable
git repack -A -d
git gc --aggressive --prune=now

执行仓库压缩
git gc --prune=now

推送到远程仓库
git push origin --force --all

Git 把文件存储在 .git/objects 之中
find .git/objects/ -type f | wc -l
git init
使用当前仓库进行初始化
git init

在指定目录创建一个空的 Git 仓库,运行这个命令会创建一个名为 demo,只包含 .git 子目录的空目录
git init --bare demo

使用模板创建仓库
git init --bare demo --template=<template_repo_dir>
git log
显示所有 commit 日志
git log

将日志缩写为单行显示
git log --pretty=oneline

图示提交日志
git log --pretty=format:'%h %s' --graph

展示简化的 commit 历史
git log --pretty=oneline --graph --decorate --all

查看分支合并情况
git log --oneline --graph
git log --oneline master..release    # 查看两个分支之间的 commit
git log --oneline --graph README.md  # 查看指定文件 log,似乎没有用

查看分叉历史,包括:提交历史、各个分支的指向以及项目的分支分叉情况
git log --oneline --decorate --graph --all

查看分支合并情况
git log --pretty=oneline --graph --abbrev-commit

显示提交日志及相关变动文件
git log --stat

查看最新3条 commit 日志数据
git log -3

不知道这是干啥的
git log -p -m

打印出某个用户的提交记录
git log --author="wmh"

显示操作本地版本库的命令,包括 commit 和reset 等
git reflog

降序排序
git log --reverse

查看特定分支测试用例
git log --reverse <branchName>

打印出 PR 的 commit
git log --merges --pretty=format:"%h - %an,%ar : %s"

最近1周
git log --merges --since="2 weeks ago" --pretty=format:"%h - %an,%ar : %s"

最近10个
git log --merges -n 10 --pretty=format:"%h - %an,%ar : %s"
git pull
取回远程主机某个分支的更新,再与本地的指定分支合并
git pull <hostName> <branchName>:<localBranchName>
取回 origin 主机的 master 分支,与本地的 dev 分支合并
git pull origin master:dev

取回 origin/master 分支,再与当前分支合并
git pull origin master
上一条命令实质上等同于先 git fetch,再 git merge
git fetch origin
git merge origin/master
git push
上传本地指定分支到远程仓库
git push <hostName> <branchName>

强行推送当前分支到远程仓库,即使有冲突
git push <hostName> --force

推送所有分支到远程仓库
git push <hostName> --all

使用账号密码进行 push 注:账号密码中的@需要用%40替换
git push -f https://<username>:<password>@gitee.com/iewiewiew/wei-demo-001.git main
git push -f https://username%40demo.com:123456@gitee.com/iewiewiew/wei-demo-001.git main

以镜像的方式传到远程仓库(用于将本地仓库的所有分支和标签推送到远程仓库,并且保持远程仓库与本地仓库完全一致)
git push --mirror git@gitee.com/path/to/path/new_project_name.git
git rebase
@todo git 压缩历史指定区间提交记录
git remote
添加远程仓库
git remote add origin git@gitee.com:iewiewiew/wei-notebook.git

推送远程仓库
git push -u origin master

查看所有远程主机
git remote

查看远程主机的网址
git remote -v

查看该主机的详细信息
git remote show origin

删除远程仓库
git remote rm origin

修改远程主机名称
git remote rename <oldHostName> <newHostName>

修改远程仓库的 URL 地址
git remote set-url <hostName> <newRepoUrl>

git prune 的作用是:用户在服务端删分支 dev,本地仓库中仍然存在远端分支 dev 的信息,则 git prune 会把远端存在本地的信息删除。也就是刷新本地仓库与远程仓库的保持这些改动的同步。
从对象数据库中删除所有不可访问的对象
git remote prune origin

演习将要删除的对象,实际上并不会删除
git remote prune -n origin

查看远端分支情况
git remote show origin
git reset
HEAD 表示当前版本
HEAD^ 上一个版本
HEAD^^ 上上一个版本
HEAD^^^ 上上上一个版本
HEAD~0 表示当前版本
HEAD~1 上一个版本
HEAD^2 上上一个版本
HEAD^3 上上上一个版本
撤销 add
撤销所有 add 文件
git reset HEAD .

撤销单个 add 文件
git reset HEAD -filename
撤销 commit
查看提交记录
git log

不删除工作区改动的代码,撤销 commit,不撤销 git add .
git reset --soft <commit>
回到上一个版本
git reset --soft HEAD^

不删除工作区改动的代码,撤销 commit,撤销 git add .
git reset --mixed <commit>
回到上一个版本
git reset --mixed HEAD^

删除工作区的代码,撤销 commit,撤销 git add . 回到上一次 commit 的状态
git reset --hard <commit>
回到上一个版本
git reset --hard HEAD^
回到上两个版本
git reset --hard HEAD^^

将历史提交合并为一个
git reset --soft <第一个 commit 的 id>
git commit --amend -m "提交代码"
撤销 commit (已经 push)
查看提交记录
git log

git reset --hard <commit 版本号>

完成撤销,同时将代码恢复到前一 commit_id 对应的版本
git push <远程主机名> <本地分支名>:<远程分支名> --force

要加上 force 不然会提示
error: failed to push some refs to '地址'
hint: Updates were rejected because the tip of your current branch is behind
git revert
原理: git revert 是用于“反做”某一个版本,以达到撤销该版本的修改的目的。比如,我们 commit 了三个版本(版本一、版本二、 版本三),突然发现版本二不行(如:有 bug),想要撤销版本二,但又不想影响撤销版本三的提交,就可以用 git revert 命令来反做版本二,生成新的版本四,这个版本四里会保留版本三的东西,但撤销了版本二的东西。

查看版本号
git log --pretty=oneline

撤销某一个提交 git revert -n <版本号>
注意:这里可能会出现冲突,那么需要手动修改冲突的文件。而且要 git add 文件名

撤销最后一个提交
git revert HRAD

用于继续未完成的撤销操作
git revert --continue

撤销多个提交
git revert <commit1> <commit2> ...

跳过此补丁
git revert --skip

取消反转提交操作
git revert --abort

工具方式:在 IDEA 的 Git 菜单的某条 commit 记录右键,选择 Revert Commit
git rm
删除工作区文件
git rm -f <file>
git rm -f <file1> <file2>

停止追踪指定文件,但该文件会保留在工作区
git rm --cached <file>

删除所有 Git 跟踪的文件和文件夹
git rm -r --cached .

删除所有未跟踪的文件
git clean -df
git show
显示某个提交的详细内容
git show dfb02e6e4f2f7b573337763e5c0013802e392818

显示 HEAD 提交日志
git show HEAD

显示 HEAD 的父(上一个版本)的提交日志 ^^为上两个版本 ^5为上5个版本
git show HEAD^

显示上5个版本
git show HEAD@{5}

显示 master 分支昨天的状态
git show master@{yesterday}

显示某次提交的元数据和内容变化
git show <commit-id>

显示某次提交发生变化的文件
git show --name-only <commit-id>

显示某次提交时,某个文件的内容
git show <commit-id>:<filename>
git stash
- stash 的原理:将本地没提交的内容(git commit 的内容不会被缓存,但 git add 的内容会被缓存)进行缓存并从当前分支移除,缓存的数据结构为堆栈,先进后出。
- 场景:在 A分支修改文件,但不想 commit,使用 git stash,git checkout B 分支之后,修改的文件并不会带到 B分支,再 git checkout A 分支,使用 git stash pop 找出来。
stash 的参数详解:
git stash 与git stash save 是一样的,将没有提交的内容缓存并移除,而这条缓存名称为最新一次提交的 commit -m 的内容,如果没有本地提交则是拉远程仓库是的 commit 内容。

- git stash save "xxx":加上自己的注解进行缓存。
- git stash list:返回缓存的列表。
- git stash pop:将堆栈中最新的内容 pop 出来应用到当前分支上,且会删除堆中的记录。
- git stash drop [名]:删除单个缓存 举例 git stash drop stash@{0}。
- git stash clear:全清。
- git stash show [名]:显示与当前分支差异 举例 git stash show stash@{0} 加上-p 可以看详细差异。
- git stash branch:指定或最新缓存创建分支。
git status
检查当前文件状态输出十分详细
git status

简短输出
git status -s
git submodule
主模块名称:sub_main
子模块名称:sub_son

git clone https://gitee.com/xxx/sub_main.git
cd sub_main 执行:git submodule add https://gitee.com/xxx/sub_son.git

添加子模块
git submodule add git@gitee.com:hightest/wei-demo-001.git
git submodule add git@gitee.com:hightest/wei-demo-001.git ./sub001  # 指定目录

添加本地仓库为子模块 注:未实践成功
git submodule add /path/to/local-repo submodules/local-repo

初始化子模块
git submodule init

对子模块获取远程项目中最新的状态
git submodule update

git submodule update --remote <submodule-name>
在此命令中,<submodule-name> 是要更新的子模块的名称

更新所有子模块
git submodule update --remote

自动初始化并更新仓库中的每一个子模块, 包括可能存在的嵌套子模块
git clone --recurse-submodules https://gitee.com/xxx/sub_main.git

将 git submodule init 和git submodule update 合并成一步
git submodule update --init

如果还要初始化、抓取并检出任何嵌套的子模块
git submodule update --init --recursive

添加子模块后会生成 .gitmodules 文件,文件内容如下:
[submodule "sub001"]
    path = sub001
    url = git@gitee.com:hightest/wei-demo-001.git

[submodule "sub002"]
    path = sub002
    url = ../wei-demo-001.git  # 相对路径

删除子模块
git submodule deinit <子模块路径>
git submodule deinit submodules/local-repo  # 这将取消初始化子模块,但不会删除子模块的文件
git rm submodules/local-repo
git subtree
git subtree 相关命令
git subtree add   --prefix=<prefix> <commit>
git subtree add   --prefix=<prefix> <repository> <ref>
git subtree pull  --prefix=<prefix> <repository> <ref>
git subtree push  --prefix=<prefix> <repository> <ref>
git subtree merge --prefix=<prefix> <commit>
git subtree split --prefix=<prefix> [OPTIONS] [<commit>]

在父仓库中添加子模块
git subtree add --prefix=foo https://github.com/demo/foo.git master --squash
解释:
--squash 是将 subtree 的改动合并到一个 commit,不用拉取子模块完整的历史纪录
这里 --prefix 后面的 = 也可以使用空格,注意这里的 foo 就是项目克隆后在本地的目录名
命令中的 master 指的是 subtree 项目的分支名
可以使用 git status 和 git log 查看提交

更新子模块仓库
git subtree pull --prefix=foo https://github.com/demo/foo.git master --squash

将更改推送到子模块仓库
git subtree push --prefix=foo https://github.com/demo/foo.git master
git tag
查看本地 tag
git tag -l

查看本地 tag,并展示详细信息
git tag -n

查看所有远程 tag
git ls-remote --tags origin

查看 tag 信息
git show <tagName>

查看 tag 日志
git log <tagName>

检出 tag
git checkout -b <branchName> <tagName>

创建 tag
git tag -a <tagName> -m "create tag"

推送 tag 到远程仓库
git push origin <tagName>

推送所有 tag 到远程仓库
git push origin --tags

拉取所有 tag
git fetch --tags

删除本地 tag
git tag -d <tagName>

删除本地所有 tag
git tag -l | xargs git tag -d

删除远程 tag
git push origin :refs/tags/<tagName>

删除远程所有 tag
git ls-remote --tags origin | awk '{print ":" $2}' | xargs git push origin

删除远程所有 tag,排除包含 `^{}` 的标签,以避免错误的引用规格
git ls-remote --tags origin | awk '{print ":" $2}' | grep -v '\^{}' | xargs git push origin
git ls-remote
git ls-remote 作用
- 显示远程引用:git ls-remote 将显示远程仓库中的所有引用。这包括远程分支(remote branches)、标签(tags)和其他引用。它会列出引用的 SHA 值(提交的唯一标识符)和它们的名称。
- 获取远程分支列表:通过运行 git ls-remote 加上远程仓库的 URL,可以获取远程仓库中所有分支的列表。
- 检查标签信息:使用 git ls-remote,可以查看远程仓库中的标签信息。它将显示标签的 SHA 值和名称。
- 获取引用的 SHA 值:通过运行 git ls-remote 并指定特定的引用名称,可以获取该引用的 SHA 值。
设置 GIT_CURL_VERBOSE 环境变量为 1:GIT_CURL_VERBOSE=1 git ls-remote。Git 将在执行 ls-remote 操作时输出与远程仓库之间的所有交互信息,包括请求和响应的详细内容。
注意:GIT_CURL_VERBOSE 只对使用基于 cURL 库的 Git 协议(例如 HTTPS)进行通信的情况有效。如果使用其他协议,如 SSH,它可能不会产生任何输出。
计算 git ls-remote命令的输出的SHA-256 哈希值
git ls-remote | sha256sum
git ls-remote https://gitee.com/mirrors/git.git | sha256sum
git for-each-ref
git for-each-ref 是一个 Git 命令,用于遍历和显示引用(references)本地仓库的信息。引用可以是分支(branches)、标签(tags)、远程分支(remote branches)或其他引用。
git for-each-ref
git for-each-ref | sha256sum
git for-each-ref --format='%(refname:short) %(objectname:short)' refs/heads/
other
查看提交信息
git cat-file -p <错误信息 ID>

查看提交信息 -p <分支名称>
git cat-file -p master

查看使用了多少空间
git count-objects -v

查看 refs 文件夹存储信息
git show-ref --head --dereference

内部命令:显示某个 git 对象
git ls-tree HEAD

内部命令:显示某个 ref 对于的 SHA1 HASH
git rev-parse master

显示指定文件是什么人在什么时间修改过
git blame <file>

查看暂存区中的文件列表
git ls-files

只统计项目代码的总行数
git ls-files | xargs cat | wc -l

统计项目代码的总行数并展示文件名
git ls-files | xargs wc -l

仅复制交给 git 管理的文件(不包含中文文件)
git ls-files | xargs -I {} rsync -R "{}" /Users/menghuawei/IdeaProjects/my-project/iewiewiew.github.io/my-website/docs/

仅复制交给 git 管理的文件(包含中文文件)
git ls-files -z | xargs -0 -I {} rsync -R "{}" /Users/menghuawei/IdeaProjects/my-project/iewiewiew.github.io/my-website/docs/

放弃本地修改,使用远程仓库代码强制覆盖本地命令
git fetch --all
git reset --hard origin/master
git pull

当 master 代码改动了,需要更新开发分支(dev)上的代码
git checkout main
git pull
git checkout dev
git merge main
git push -u origin dev

查看.git 目录结构
find .git

查看某段代码是谁写的
git blame <file-name>

查看两个星期内的改动
git whatchanged --since='2 weeks ago'

展示所有 tracked 的文件
git ls-files -t

展示所有 untracked 的文件
git ls-files --others

展示所有忽略的文件
git ls-files --others -i --exclude-standard

查看 Git 某个分支下的提交数
git rev-list --count <branchName>
git rev-list --count master

列出所有分支的所有提交
git rev-list --all

列出指定分支的所有提交
git rev-list <branch-name>

列出 commit-a 到 commit-b 之间的所有提交
git rev-list commit-a..commit-b

列出最近 3 次提交
git rev-list HEAD~3..HEAD

列出某个文件的提交历史
git rev-list HEAD -- path/to/file
git rev-list HEAD -- README.md

列出某个目录下所有文件的提交历史
git rev-list HEAD -- path/to/directory

列出项目的根提交
git log $(git rev-list --max-parents=0 HEAD)

查看 Git 某个分支下的文件数
git ls-tree -r <branchName> --name-only | wc -l
git ls-tree -r master --name-only | wc -l

查看 Git 某个分支下的贡献者
git shortlog -s <branchName>
git shortlog -s master

查看 Git 某个分支下的贡献者排名
git shortlog -s -n <branchName>
git shortlog -s -n master

查看 Git 仓库下的代码行数
git log --pretty=tformat: --numstat | awk '{ add += $1; subs += $2; loc += $1 - $2 } END {
printf "added lines: %s,removed lines: %s,total lines: %s\n",add,subs,loc }'

查看 Git 仓库下的代码行数 指定时间段和作者
git log --since =2023-01-01 --until==2023-12-31 --author="name" --pretty=tformat: --numstat | awk '{ add += $1; subs += $2; loc += $1 - $2 } END {
printf "added lines: %s,removed lines: %s,total lines: %s\n",add,subs,loc }'

批量移除仓库已有的 .DS_Store
find . -name .DS_Store -print0 | xargs -0 git rm -f --ignore-unmatch
find . -name .DS_Store -type f -delete

要统计某个 Git 仓库中交给 Git 管理的文件大小
git ls-files -z | xargs -0 du -ch | tail -1

要统计某个 Git 仓库中交给 Git 管理的文件大小前十名文件
git rev-list --objects --all | \
  git cat-file --batch-check='%(objecttype) %(objectname) %(objectsize) %(rest)' | \
  awk '/^blob/ {print $3, $4}' | \
  sort -nr | \
  head -n 10 | \
  numfmt --to=iec --field=1 --suffix=B
4. Git 知识碎片
常用操作
克隆仓库再推到远程
克隆仓库
git clone git@example.com:testent001/test_repo.git
git fetch origin
git checkout <branchName>

克隆仓库(一行命令)
git fetch --all && git branch -r | grep -v '\->' | while read remote; do git checkout --track $remote; done

推送远程
git remote add origin_new git@example.com:testent001/test_repo2.git
git push -f origin_new --all

本地分支关联远程分支(可不执行)
git push -u origin_new master

删除 remote(可不执行)
git remote remove <remoteName>
制造冲突
在页面新增分支(起点 Master) branch1,添加 test.txt 文件,内容为:11 在页面新增分支(起点 Master) branch2,添加 test.txt 文件,内容为:22
git clone <remoteUrl>
git fetch origin
git checkout branch1
git merge origin/branch2
vim test.txt 解决冲突
git add .
git commit 按 enter,出现编辑框,内容:Merge remote-tracking branch 'origin/branch2' into branch1
:wq! 保存提交
git push -f
解决本地和远程的冲突
git checkout master
git pull https://gitee.com/test/test_repo_001.git branch_1
git push origin master
回退代码
查看 commits 记录: git reflog
查看 commits 记录(详细): git log
撤销已经 push 的commit
1、git log 拿到要回退的版本号:3d0c40d40074a2ba0c4756d7d1697983c398bd0f
2、git reset –-soft <版本号> ,如 git reset --soft 3d0c40d40074a2ba0c4756d7d1697983c398bd0f ,重置至指定版本的提交,达到撤销提交的目的;回退本地代码:git reset --hard <版本号>
3、git push origin master --force ,强制提交当前版本号
问题:当我们有时候回滚了代码,想强制 push 到远程仓库的时候,git push origin --force,会报如下错误:You are not allowed to force push code to a protected branch on this project
解决:如果用的是 gitlab 版本库,这说明 gitlab 对仓库启用了保护,需要在仓库中设置一下:进入项目 gitlab 网页版: 设置(setting)> 版本库(repo)> 保护分支(把保护的分支选择 unprotected)合并 commit git rebase 进行 git 压缩:git rebase -i HEAD~2 对最近的3个 commit 进行 rebase 操作
对于 commit 合并可以使用 squash、fixup 指令,
squash:将该 commit 的注释添加到上一个 commit 注释中
fixup:是放弃当前 commit 的注释
drop:删除当前 commit(drop 和fixup 的区别是啥?)
本地合并分支
1. 创建一个文件并提交
git init
echo "Initial commit on main branch" > file.txt
git add file.txt
git commit -m "Initial commit on master branch"
git branch

2. 创建 squash-base 分支并提交
git checkout -b squash-base
echo "This is a change in squash-base." > file1.txt
git add file1.txt
git commit -m "Add file1.txt in squash-base"

3. 切换到 master 分支
git checkout master

4. 创建 squash-head 分支并提交
git checkout -b squash-head
echo "This is a change in squash-head." > file2.txt
git add file2.txt
git commit -m "Add file2.txt in squash-head"

5. 合并,用 --no-ff 选项来进行合并,这样会创建一个合并提交,并且保留合并信息
git checkout squash-head
git merge --no-ff squash-base
产生日志:Merge branch 'squash-base' into squash-head

6. 查看日志(可不执行)
git log --oneline

7. 其它,推送所有本地分支到远程(可不执行)
git push -f --all
本地和远程连通检验
ssh -T gitee.com
ssh -vvT gitee.com
端口默认 22,如果不是则需 -p 指定端口
ssh -p 22 -T gitee.com
常见问题
git https 和 git ssh 的区别
- https
- clone 项目:使用 https 方式时,没有要求,可以直接克隆下来
- push 项目:使用 https 方式时,需要验证用户名和密码
- 端口:一般使用 443 端口
- 安全:通过用户名/密码授权,可用性比较高
- 速度:速度相较快点,一般企业防火墙会打开 80 和 443 这两个 http/https 协议的端口,很方便;而对于 ssh 来说,企业防火墙很可能没打开 22 端口
- 总结:https 利于匿名访问,适合开源项目,可以方便被别人克隆和读取(但没有 push 权限)
- ssh
- clone 项目:使用 ssh 方式时,需要配置 ssh key,即要将生成的 ssh 密钥对的公钥上传至服务器
- push 项目:使用 ssh 方式时,不需要验证用户名和密码,之前配置过 ssh key,(如果你没设置密码) 直接 push 即可
- 端口:一般使用 22 端口
- 速度:速度相较慢点
- 总结:ssh 不利于匿名访问,比较适合内部项目,只要配置了 ssh 公钥极可自由实现 clone 和 push 操作
git fetch 和 git pull 的区别
相同点 首先在作用上他们的功能是大致相同的,都是起到了更新代码的作用。
不同点
- git fetch:git fetch 会将数据拉取到本地仓库,它并不会自动合并或修改当前的工作。
- git pull:git pull 是从远程获取最新版本并 merge 到本地,会自动合并或修改当前的工作。git pull = git fetch + git merge。
git rebase 和 git merge 的区别
- rebase 会把你当前分支的 commit 放到公共分支的最后面,所以叫变基。就好像你从公共分支又重新拉出来这个分支一样。 举例:如果你从 master 拉了个 feature 分支出来,然后你提交了几个 commit,这个时候刚好有人把他开发的东西合并到 master 了,这个时候 master 就比你拉分支的时候多了几个 commit,如果这个时候你 rebase master 的话,就会把你当前的几个 commit,放到那个人 commit 的后面。
- merge 会把公共分支和你当前的 commit 合并在一起,形成一个新的 commit 提交。
使用场景:
个人开发,拉公共分支最新代码的时候使用 rebase,好处是提交记录会比较简洁,缺点就是 rebase 以后不知道当前分支最早是从哪个分支拉出来的。
团队开发,往公共分支上合代码的时候,使用 merge。但无论个人开发还是团队开发建议还是用 merge。
cherry pick 的 fast forward、non-fast forward 的区别
- Fast-forward 合并:使用 git cherry-pick 时,如果要合并的提交在当前分支的提交历史中是连续的,没有其他提交插入其中,那么 Git 会执行一个快进(fast-forward)合并。 这意味着 Git 只需要简单地将当前分支的 HEAD 指针移动到要合并的提交上,不需要创建新的合并提交。
- Non-fast-forward 合并:如果要合并的提交不在当前分支的提交历史中,也就是说在合并过程中需要创建一个新的合并提交,那么 Git 会执行一个非快进(non-fast-forward)合并。 这意味着 Git 需要创建一个新的合并提交,将要合并的提交合并到当前分支上。
git branch --show-current 和 git branch 的区别
git branch --show-current 和 git branch 是 Git 命令中用于查看当前分支和分支列表的两个不同命令。
- git branch --show-current:该命令用于显示当前所在的分支名称。它是 Git 2.22 版本引入的新命令。执行该命令会输出当前所在分支的名称,例如 "main"、"develop" 或其他分支名称。如果当前没有分支或者不在任何分支上,则不会输出任何结果。
- git branch:该命令用于列出所有分支的列表。执行该命令会显示本地仓库中所有的分支名称,并在当前分支前面添加一个星号 (*) 标记。被标记的分支即为当前所在的分支。 git branch --show-current 有分支 master,git branch 无分支,添加或者修改文件,执行 git add .,git commit -m "123" 即可。
合并分支、扁平化分支、变基并合并的区别
- 合并分支(Merge)
合并分支是指将一个分支的更改合并到另一个分支中。这通常是在开发一个功能或修复一个 bug 时使用的。合并分支会将源分支中的提交应用到目标分支中,并创建一个新的合并提交,将两个分支的历史记录合并在一起。使用 Git 命令
git merge即可实现合并分支。 - 扁平化分支(Squash)
扁平化分支是指将一个分支的多个提交压缩成一个提交。这通常是在提交一个功能或修复一个 bug 的最终版本时使用的。扁平化分支可以使提交历史记录更加简洁,减少噪音。使用 Git 命令
git merge --squash可以将一个分支的多个提交压缩成一个提交。 - 变基并合并(Rebase and Merge)
变基并合并是指将一个分支上的提交应用到另一个分支上,但是与合并分支不同的是,它会将源分支的提交“重放”到目标分支上。这样可以在目标分支上形成一条干净的提交历史记录,但也可能会带来一些风险,因为它会改变提交的顺序和 SHA-1 值。使用 Git 命令
git rebase可以对源分支进行变基操作,然后再使用git merge将源分支合并到目标分支。
git 拓展
git 炸弹
什么是 Git 炸弹(git bomb)? 示例仓库 git-bomb
Git 炸弹:指一个 git 仓库,.git 目录很小,但是 checkout 工作区会占据很大的磁盘空间。大体原理小文件大量地重复引用,git checkout 的时候复制出海量小文件,从而占据大量磁盘空间,导致当前机器磁盘被占满。 描述:git 炸弹检测页面提示(同一个文件内容被引用到很多文件中,检出时占据大量磁盘空间,可能会导致客户端磁盘占满)
git LFS
代码托管支持 Git LFS(Large File Storage,大文件存储)协议,可以把音乐、图片、视频等指定的任意大文件资源存储在 Git 仓库之外,对于使用者而言,类似在操作一个完整的 Git 仓库,非常方便。通过将大文件存储在 Git 原有的数据结构之中,可以减小 Git 仓库本身的体积,使克隆 Git 仓库的速度加快,也使得 Git 不会因为仓库中充满大文件而损失性能。 当您要上传的文件单个超过200M 时,需要使用 Git LFS。 git-lfs 官网 git-lfs 安装教程
Mac 安装 lfs
/usr/bin/ruby -e "$(curl -fsSL https://raw.giteeusercontent.com/Homebrew/install/master/install)"
brew install git-lfs

Linux 安装 lfs
https://gitee.com/git-lfs/git-lfs/releases/tag/v3.3.0
下载安装包之后进行解压,执行:./install.sh

进入仓库进行 lfs 初始化,
git lfs install

取消 LFS 的全局配置
git lfs uninstall

在~/.gitconfig 自动新增如下配置,查看 cat ~/.gitconfig
[filter "lfs"]
        required = true
        clean = git-lfs clean -- %f
        smudge = git-lfs smudge -- %f
        process = git-lfs filter-process

追踪所有后缀名为".psd"的文件
git lfs track "*.psd"

追踪单个文件
git lfs track "logo.png"

查看已追踪的文件,可以通过 git lfs track,或通过查看".gitattributes"文件,获取详情
git lfs track

取消追踪文件(注:需要双引号)
git lfs untrack "*.extension"
git rm --cached "*.extension"
git add . && git commit -m "test" && git push -f origin master

例子
git lfs untrack "logo.png"
git lfs --cached "logo.png"

提交大文件
提交代码时需要将".gitattributes"文件也提交到仓库,提交完成后,执行 git lfs ls-files 命令可以查看 LFS 跟踪的文件列表

使用 命令克隆包含"Git LFS”文件的远程仓库到本地

如果一个仓库中包含 LFS 内容,但是在推送时不想推送这类文件,只要加上 --no-verify 选项就行,即:git push --no-verify

迁移已有的 git 仓库使用 git lfs 管理
重写 master 分支,将历史提交中的 *.zip 都用 git lfs 进行管理
git lfs migrate import --include-ref=master --include="*.zip"

重写所有分支及标签,将历史提交中的 *.rar,*.zip 都用 git lfs 进行管理
git lfs migrate import --everything --include="*.rar,*.zip"

手动同步
若 Gitee 的Git-LFS 自动同步不满足使用需求时,可以手动同步 Git-LFS 到Gitee 仓库
以 https://huggingface.co/bert-base-uncased.git 为例
git clone https://huggingface.co/bert-base-uncased
cd bert-base-uncased
git lfs fetch --all
git lfs push https://gitee.com/<your-gitee-repo-path>.git --all

踩坑
同步到码云报错:
1、WARNING: Authentication error: Authentication required: LFS only supported repository in paid enterprise.
2、batch response: LFS only supported repository in paid enterprise.
解决1:git config lfs.https://gitee.com/{your_gitee}/{your_repo}.git/info/lfs.locksverify false
解决2:rm .git/hooks/pre-push

检查Git LFS对象的状态
git lfs fsck
git lfs install --skip-smudge 是 Git LFS(Large File Storage)的安装命令,其中的 --skip-smudge 选项用于在安装 Git LFS 时跳过默认的清理过滤器设置。
在 Git LFS 中,清理过滤器(smudge filter)是用于在检出文件时自动替换指定的大文件(通常是二进制文件)为其指针的机制。这有助于减小仓库的体积,因为实际的大文件内容会被存储在 Git LFS 服务器上,而不是直接存储在 Git 仓库中。
git Hooks
pre-receive
是部署在服务器的全局钩子,对提交的文件名,文件内容(grep),commit 信息进行处理。实现对提交的控制。
这是在更新推送的引用之前在远程仓库上调用的。 非零状态将中止该过程。 尽管它不接收任何参数,但它会通过标准输入以"<old-value> <new-value> <ref-name>”的形式为每个 ref 传递一个字符串。

proc-receive
这个钩子由 git-receive-pack(1) 调用。 如果服务器设置了多值配置变量 receive.procReceiveRefs,发送到 receive-pack 的命令有匹配引用名称,这些命令将由这个钩子执行,而不是由内部 execute_commands() 函数。 这个钩子负责更新相关的引用并将结果报告回 receive-pack。

update
对于每个被推送的 ref,这在远程仓库上运行一次,而不是每次推送一次。 非零状态将中止该过程。 例如,这可用于确保所有提交都只是快进。

post-receive
在更新所有 refs 后推送时,这将在远程运行。 它不接受参数,而是通过标准输入以"<old-value> <new-value> <ref-name>”的形式接收信息。 因为它是在更新之后调用的,所以它不能中止该过程。
git Scalar
巨型 Git 仓库管理工具 Scalar
Introducing Scalar: Git at scale for everyone
scalar version

scalar register

scalar unregister

scalar run all?

scalar clone <url>
scalar clone https://dev.azure.com/ms-scalar/_git/scalar
GPG 签名
Mac 安装 GPG
brew install gpg
brew install gnupg
brew install gnupg2
which gpg
ln -s /opt/homebrew/bin/gpg /opt/homebrew/bin/gpg2

生成 GPG 密钥对 用户名:iewiewiew 邮箱:1425615649@qq.com 密码:12345678
gpg2 --full-generate-key

列出公钥和私钥的长形式 GPG 密钥
gpg2 --list-secret-keys --keyid-format=long

GPG key ID:488D9C1B9E6C5E34

导出 GPG 公钥
gpg2 --armor --export <GPG 密钥 ID>
gpg2 --armor --export 491E9A1F702B85F73A66A45C488D9C1B9E6C5E34

复制 GPG 密钥,从 -----BEGIN PGP PUBLIC KEY BLOCK----- 开始,到 -----END PGP PUBLIC KEY BLOCK----- 结束。
将 GPG 密钥添加到具体的 账户上即可。

配置 Git
git config --global gpg.program gpg2
git config --local user.signingkey 491E9A1F702B85F73A66A45C488D9C1B9E6C5E34

使用 GPG 签名进行提交
git commit -S -m "test gpg"

查看签名状态
git log --show-signature

查看 GPG 公钥
https://gitee.com/<username>.gpg

导入平台 GPG 公钥
curl https://gitee.com/<username>.gpg | gpg --import

将平台 GPG 公钥设置为绝对信任
gpg --edit-key <GPG 密钥 ID>

踩坑:用户名得是远端仓库的用户名?
git commit message helper
IDEA 插件:git commit message helper
规范的 Git提交描述格式:
# Header头
<type>(<scope>): <subject>

# Body体
<body>

# Footer体
<footer>
- Header头只有一行,包括3个字段: type(必需),scope(可选),subject(必需)
| 属性 | 描述 |
|---|---|
| type(必填) | commit提交类型 |
| scope(选填) | commint提交影响范围 |
| subject(必填) | commint提交简短描述 |
- type 提交类型,type说明提交类型:只允许使用下面属性
| 属性 | 描述 |
|---|---|
| feat | 新功能 |
| fix | 修改bug |
| docs | 文档修改 |
| style | 格式修改 |
| refactor | 重构 |
| perf | 性能提升 |
| test | 测试 |
| build | 构建系统 |
| ci | 对CI配置文件修改 |
| chore | 修改构建流程、或者增加依赖库、工具 |
| revert | 回滚版本 |
- scope 作用范围
scope说明提交影响范围:一般是修改的什么模块或者是什么功能,如【xx模块】/【xx功能】
- subject 提交主题
subject 说明提交简短描述:一般是5-10各自简单描述做的任务,如【xx模块加入消息队列】
CODEOWNERS
添加 CODEOWNERS 文件 填写内容:
* @gitqa
/test_codeowner.txt @gitqa @gitqa2
/aa/test_codeowner.txt @gitqa @gitqa2
/aa/bb/ @gitqa @gitqa2
知识碎片
“内容寻址存储(content addressed storage)”,它指的是对象在数据库中的文件名与文件内容的哈希值相同。
git push origin HEAD:refs/heads/<branchName>
将本地的 HEAD 提交推送到远程仓库的分支,refs/heads/ 表示将提交推送到远程仓库的正常分支,而不是用于代码审查的分支。
注意:将 heads 填错为 head 也不会报错,实际上推上去,但是查不出来
其它命令
git push origin refs/tags/<tag_name>
git push origin refs/tags/v1.0.0
git push origin refs/pull/1
查看仓库中的大文件
git rev-list --objects --all | grep -E "$(git verify-pack -v .git/objects/pack/*.idx | sort -k 3 -n | tail -10 | awk '{print$1}' | sed ':a;N;$!ba;s/\n/|/g')"
空提交
git commit --allow-empty
git squash 提交 5 次 commit git rebase -i HEAD~n (n 是要压缩的提交数量) 将要压缩的提交的 pick 改为 squash(或简写为 s),只保留第一个提交为 pick 保存并退出编辑器
1. 创建并切换到功能分支:
git checkout -b feature-branch

2. 进行一些提交:
echo "First change" > file.txt
git add file.txt
git commit -m "Add first change"

echo "Second change" >> file.txt
git add file.txt
git commit -m "Add second change"

echo "Third change" >> file.txt
git add file.txt
git commit -m "Add third change"

3. 切换回主分支:
git checkout master

4. 执行 Squash Merge:
git merge --squash feature-branch

5. 提交更改:
git commit -m "Merge feature-branch with squash"

6. 查看提交历史:
git log --oneline

7. 其它
git checkout feature-branch
git push origin feature-branch
拉取 A 仓库的所有分支,并推送到远程 B 仓库
git clone --mirror https://github.com/user/repoA.git

cd repoA.git
git remote add b-repo https://github.com/user/repoB.git

git push -f b-repo --all
git push -f b-repo --tags
查询 Git LFS 文件大小 du -sh .git/lfs
GIT_CURL_VERBOSE 是一个环境变量,用于在使用 Git 时启用详细的 cURL 输出。
export GIT_CURL_VERBOSE=1
git fetch origin
关闭详细输出:unset GIT_CURL_VERBOSE
5. 踩坑
问题一 现象:remote: [session-7f4367b7] You hasn't joined this enterprise! 解决1:进入控制台 > 打开钥匙串 > 修改用户的密码 解决2:git config --global --unset credential.helper,重新输入当前的账户和密码
问题二 现象:gitee 报错"remote: [session-7f4367b7] Access denied 原因:在2个 git 账号切换的时候,需要清除上一个账号的信息,重新输入当前的账户和密码 解决:git config --system --unset credential.helper
问题三 现象:git pull/push 报错:fatal: refusing to merge unrelated histories 原因:两个分支历史记录是完全独立的 解决:git pull origin master --allow-unrelated-histories
问题四 现象:git push 报错:! [remote rejected] master -> master (no merge base found) 原因:分支历史分开:本地分支的历史与远程分支的历史完全不同,可能是由于强制推送或重写历史造成的。 分支被重置:远程分支可能被重置,导致本地分支无法找到共同的合并基础。